Today We’re gonna install PHP, MySQL and WordPress 5.5 on a new machine running Linux Ubuntu 20, and as a bonus, We’ll make a script to do it for us in the future.
I’m running all the steps in this tutorial with root privileges, so make sure you’re logged in as root:
sudo suUpdate System
Ubuntu uses two different tools for system update:
- apt-get: Command line tool.
- Update Manager: GUI tool.
The Update Manager is a nearly 100% automatic tool. With this tool, you will not have to routinely check to see if there are updates available. Instead, you will know updates are available because the Update Manager will open on your desktop as soon as the updates depending upon their type:
- Security updates: Daily
- Non-security updates: Weekly
To manually check for updates, you can either do this by clicking the Administration sub-menu of the System menu and then selecting the Update Manager entry., or use the following command from the command line:
apt-get update -y apt-get is a tool to automatically update your Debian machine and get and install debian packages/programs.
Install Apache
Apache is an open-source and free web server software that powers around 40% of websites around the world.

When someone wants to visit a website, they enter a domain name into the address bar of their browser. Then, the web server delivers the requested files by acting as a virtual delivery man.
Apache2 is available as an Ubuntu package, therefore we can install it like this:
apt-get install apache2 apache2-utils -yWe need to enable Apache2 web server to start at system boot time, as well start the service as follows:
systemctl start apache2
systemctl enable apache2
Apache’s default document root is /var/www on Ubuntu, and the configuration file is /etc/apache2/apache2.conf. Additional configurations are stored in subdirectories of the /etc/apache2 directory such as /etc/apache2/mods-enabled (for Apache modules), /etc/apache2/sites-enabled (for virtual hosts), and /etc/apache2/conf.d.
Install PHP
PHP is an open source server side scripting Language which originally stood for ‘Personal Home Page‘ now stands for ‘PHP: Hypertext Preprocessor‘, which is a recursive acronym. WordPress is written using PHP as the scripting language. Just like WordPress, PHP is also an Open Source.
We can install PHP and the Apache PHP module as follows:
apt-get install php7.0 php7.0-mysql libapache2-mod-php7.0 php7.0-cli php7.0-cgi php7.0-gd
We must restart Apache afterwards:
/etc/init.d/apache2 restartCommon Problems:
- If the PHP scripts are not parsing via the web server, then it’s likely that PHP was not added to the web server’s configuration file, which on Ubuntu may be /etc/apache2/apache2.conf or similar.
- If an extension was seemingly installed yet the functions are undefined, be sure that the appropriate ini file is being loaded and/or the web server was restarted after installation.
- There are two basic commands for installing packages on Ubuntu:
apt-getandaptitude.
Install MySQL
We can install MySQL with this command:
apt-get install mysql-server mysql-clientYou will be asked to provide a password for the MySQL root user – this password is valid for the user root@localhost as well as root@server1.example.com, so we don’t have to specify a MySQL root password manually later on:
New password for the MySQL “root” user: <– yourrootsqlpassword
Repeat password for the MySQL “root” user: <– yourrootsqlpassword
NOTE: WordPress version 5.2+ requires PHP version 5.6.20 or greater.
The database server deployment is not yet secure, for this reason, issue the following command to harden it’s security:
mysql_secure_installation
Firstly, you will be asked to install the ‘validate_password’ plugin, so type in Y/Yes and press Enter, and also choose the default password strength level. On my system, I already installed it.
Importantly, if you do not want to change the root password, then type N/No when prompted to do so. Answer Y/Yes for the rest of the subsequent questions.
Install WordPress

Download the latest WordPress package and extract it by issuing the commands below on the terminal:
wget -c http://wordpress.org/latest.tar.gz
tar -xzvf latest.tar.gz
Then move the WordPress files from the extracted folder to the Apache default root directory /var/www/html/:
rsync -av wordpress/* /var/www/html/ Set Permissions
Next, set the correct permissions on the website directory, that is give ownership of the WordPress files to the web server as follows:
chown -R www-data:www-data /var/www/html/
chmod -R 755 /var/www/html/
Create WordPress Database
Execute the command below and provide the root user password, then hit Enter to move to the mysql shell:
mysql -u root -pAt the mysql shell, type the following commands, pressing Enter after each line of a mysql command. Remember to use your own, valid values for database_name, databaseuser, and also use a strong and secure password as databaseuser_password:
mysql> CREATE DATABASE wp_myblog;
mysql> GRANT ALL PRIVILEGES ON wp_myblog.* TO 'your_username_here'@'localhost' IDENTIFIED BY 'your_chosen_password_here';
mysql> FLUSH PRIVILEGES;
mysql> EXIT;
Add Database Credentials in wp-config
One of the most important files in your WordPress installation is the wp-config.php file. This file is located in the root of your WordPress file directory and contains your website’s base configuration details, such as database connection information.
Go the /var/www/html/ directory and rename existing wp-config-sample.php to wp-config.php
cd /var/www/html/
mv wp-config-sample.php wp-config.php
then update it with your database information under the MySQL settings section (as shown in the screenshot below):

Afterwards, restart the web server and mysql service using the commands below:
systemctl restart apache2.service
systemctl restart mysql.service
Enable mod Rewrite
Using mod_rewrite or lighttpd you can produce much nicer permalinks (see Pretty Permalinks). There are many different formats, but the most common, and most versatile looks like: https://pcx3.com/zimbra-mail-server-memcached-exploit-amplification-attacks-from-udp-port-11211/
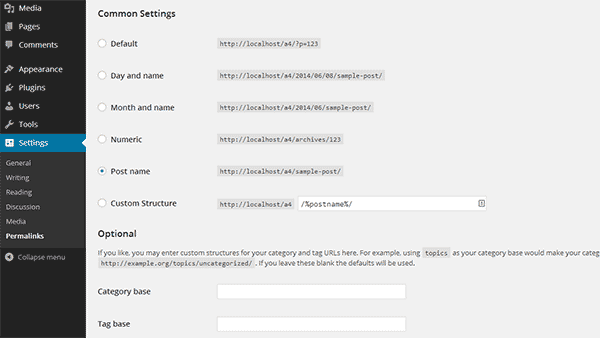
Pretty permalinks are available under Apache web server with the mod_rewrite module.
a2enmod rewrite
php5enmod mcrypt
In case your Pretty Permalinks aren’t working after enabling mod_rewrite, make sure to check the following:
- The FollowSymLinks option is enabled In WordPress’s home directory
- FileInfo directives are allowed (e.g.
AllowOverride FileInfoorAllowOverride All) - An .htaccess file (if this file is missing, WordPress will try to create it when you activate “pretty” permalinks)
- If you want WordPress to update the .htaccess file automatically, WordPress will need write access to the file.
Install PHPMyAdmin
phpMyAdmin is a web interface through which you can manage your MySQL databases. It’s a good idea to install it:
apt-get install phpmyadmin -y You will see the following questions:
- Web server to reconfigure automatically: <– apache2
- Configure database for phpmyadmin with dbconfig-common? <– No
echo 'Include /etc/phpmyadmin/apache.conf' >> /etc/apache2/apache2.conf
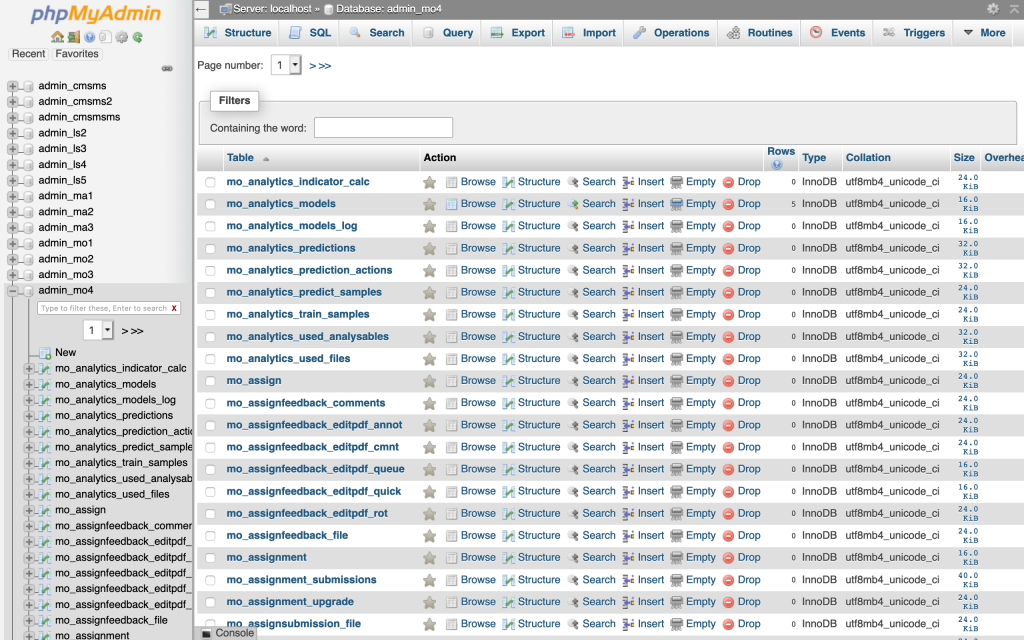
Afterwards, you can access phpMyAdmin under http://localhost/phpmyadmin/:
Restart Apache and MySQL
service apache2 restart
service mysql restart
Remove Downloaded Files
To cleanup, remove the downloaded WordPress tar file:
rm -rf latest.tar.gz wordpressBONUS: install-wp-on-ubuntu.sh
#!/bin/bash

 #######################################
 # Bash script to install WordPress on ubuntu

 ## Check if running as root
 if [ "$(id -u)" != "0" ]; then
   echo "This script must be run as root" 1>&2
   exit 1
 fi

 ## check Current directory
 pwd=$(pwd)

 ## Ask value for mysql root password
 read -p 'wordpress_db_name [wp_db]: ' wordpress_db_name
 read -p 'db_root_password [only-alphanumeric]: ' db_root_password
 echo

 ## Update system
 apt-get update -y

 ## Install Apache
 sudo apt-get install apache2 apache2-utils -y
 systemctl start apache2
 systemctl enable apache2

 ## Install PHP
 apt-get install php libapache2-mod-php php-mysql -y

 ## Install MySQL database server
 export DEBIAN_FRONTEND="noninteractive"
 debconf-set-selections <<< "mysql-server mysql-server/root_password password $db_root_password"
 debconf-set-selections <<< "mysql-server mysql-server/root_password_again password $db_root_password"
 apt-get install mysql-server mysql-client -y

 ## Install Latest WordPress
 rm /var/www/html/index.*
 wget -c http://wordpress.org/latest.tar.gz
 tar -xzvf latest.tar.gz
 rsync -av wordpress/* /var/www/html/

 ## Set Permissions
 chown -R www-data:www-data /var/www/html/
 chmod -R 755 /var/www/html/

 ## Configure WordPress Database
 mysql -uroot -p$db_root_password <<QUERY_INPUT
 CREATE DATABASE $wordpress_db_name;
 GRANT ALL PRIVILEGES ON $wordpress_db_name.* TO 'root'@'localhost' IDENTIFIED BY '$db_root_password';
 FLUSH PRIVILEGES;
 EXIT
 QUERY_INPUT

 ## Add Database Credentias in wordpress
 cd /var/www/html/
 sudo mv wp-config-sample.php wp-config.php
 perl -pi -e "s/database_name_here/$wordpress_db_name/g" wp-config.php
 perl -pi -e "s/username_here/root/g" wp-config.php
 perl -pi -e "s/password_here/$db_root_password/g" wp-config.php

 ## Enabling Mod Rewrite
 a2enmod rewrite
 php5enmod mcrypt

 ## Install PhpMyAdmin
 apt-get install phpmyadmin -y

 ## Configure PhpMyAdmin
 echo 'Include /etc/phpmyadmin/apache.conf' >> /etc/apache2/apache2.conf

 ## Restart Apache and Mysql
 service apache2 restart
 service mysql restart

 ## Cleaning Download
 cd $pwd
 rm -rf latest.tar.gz wordpress

 echo "Installation is complete."
https://github.com/stefanpejcic/Shell-Batch-Scripts/blob/master/wordpress-ubuntu.sh

